Expert Guide: Installing Heat Tape Under Mobile Home
Installing heat tape under a mobile home is a crucial step in preventing frozen pipes during cold winter months. To properly insulate and protect your plumbing system, it’s essential to know how to install heat tape under a mobile home correctly. This simple yet vital task can save you from potential water damage and costly repairs. Follow the steps outlined in this guide to ensure your mobile home’s pipes stay warm and functional all winter long.

How to Install Heat Tape Under Your Mobile Home
Welcome to our guide on installing heat tape under your mobile home to protect your pipes during the winter months. Whether you live in a cold climate or just want to be prepared for freezing temperatures, heat tape can be a lifesaver in preventing pipe damage. In this article, we will walk you through the process of installing heat tape under your mobile home step by step. Let’s get started!
Understanding the Importance of Heat Tape
Before we dive into the installation process, let’s first understand why heat tape is essential for mobile homes. During the winter, pipes under a mobile home can freeze and burst if not properly insulated. Heat tape is a simple and effective solution to prevent this from happening. It provides a constant source of heat to keep the pipes warm and flowing, even in the coldest weather.
Materials You Will Need
Before beginning the installation process, make sure you have all the necessary materials on hand. Here’s what you’ll need:
Materials:
- Heat tape
- Insulation sleeves
- Electrical tape
- Tape measure
- Scissors
- Power source (outlet or extension cord)
Step-by-Step Installation Guide
Now that you have all the materials ready, let’s walk through the process of installing heat tape under your mobile home:
Step 1: Measure the Pipes
Start by measuring the length of the pipes that need to be protected. Make sure to account for any twists and turns in the pipe layout to ensure you have enough heat tape to cover the entire area.
Step 2: Cut the Heat Tape
Using scissors, cut the heat tape to the measured length of the pipes. Be sure to follow the manufacturer’s instructions on how to cut the heat tape properly to avoid damage.
Step 3: Wrap the Pipes
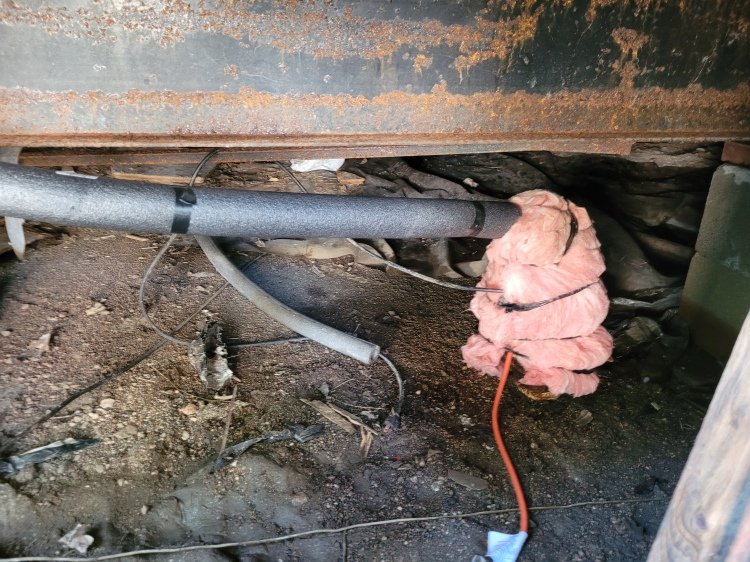
Wrap the cut heat tape around the pipes, starting from the bottom and working your way up. Secure the heat tape in place using electrical tape to ensure it stays in position.
Step 4: Insulate the Pipes
Once the heat tape is in place, slide insulation sleeves over the pipes to provide an extra layer of protection. This will help retain the heat generated by the heat tape and prevent heat loss.
Step 5: Connect to Power
Finally, connect the heat tape to a power source, such as an outlet or an extension cord. Make sure the power source is reliable and won’t be interrupted to keep the heat tape functioning effectively.
Maintaining Your Heat Tape
After the installation is complete, it’s essential to regularly check the heat tape to ensure it’s working correctly. Look for any signs of wear and tear, and replace the heat tape if necessary. Additionally, inspect the insulation sleeves for any damage and replace them as needed to maintain proper insulation.
Installing heat tape under your mobile home is a straightforward process that can save you from costly repairs due to frozen pipes. By following the steps outlined in this guide and staying proactive in maintaining your heat tape, you can ensure your pipes stay protected during the winter season. Remember, prevention is key when it comes to avoiding frozen pipes, so take the necessary steps to safeguard your plumbing. Stay warm and insulated!
Thank you for reading our comprehensive guide on how to install heat tape under your mobile home. We hope you found this information helpful and feel confident in tackling this project on your own. If you have any questions or need further assistance, feel free to reach out to us. Stay safe and warm!
Proper Heat Tape Installation for Manufactured Mobile Homes w Exposed Water Lines MyHomeinEdison.com
Frequently Asked Questions
How do I prepare to install heat tape under my mobile home?
To install heat tape under your mobile home, start by ensuring the power is turned off to the area where you will be working. Clean the underside of the mobile home to remove any debris or obstructions that could interfere with the installation process. Plan the route you want the heat tape to follow and measure the length needed accurately. Make sure to have all necessary tools and materials on hand before starting the installation.
What safety precautions should I take during the installation of heat tape under my mobile home?
When installing heat tape under your mobile home, always wear appropriate safety gear such as gloves and safety goggles to protect yourself. Ensure the power is safely turned off before beginning the installation. Use insulated heat tape specifically designed for the purpose and follow the manufacturer’s instructions carefully. Avoid overstretching the tape and keep it secured in place to prevent any hazards.
How do I properly secure the heat tape under my mobile home?
To secure the heat tape under your mobile home, use clips or heat tape straps designed for this purpose. Make sure the tape is evenly spaced and snug against the pipes to ensure efficient heat distribution. Avoid using nails or staples that could damage the tape. Secure the ends of the tape properly and insulate any exposed areas to prevent heat loss.
Final Thoughts
In conclusion, installing heat tape under a mobile home is a crucial step to prevent frozen pipes and ensure optimal heating efficiency. Remember to carefully measure, clean, and secure the heat tape along the water pipes to guarantee effective performance. By following the proper installation steps and regular maintenance, you can protect your mobile home from cold weather damage and maintain a comfortable living environment. Whether you do it yourself or hire a professional, ensuring the correct installation of heat tape under your mobile home is essential for year-round comfort and safety.